BMW X5
BMW Garage BMW Meets Register Search Today's Posts Mark Forums Read

Post Reply
 
Thread Tools Search this Thread
      11-29-2018, 04:06 PM   #1
IND-Distribution
BMW obsessed
IND-Distribution's Avatar
9571
Rep
10,851
Posts

Drives: G82 M4 / G87 M2
Join Date: Oct 2006
Location: Chicago

iTrader: (3)

IND | G05 X5 Painted Front Reflector | Installation Procedure

GENERAL NOTE: This method was created for a true garage DIY with minimal intrusion to OE equipment. The proper method would require a much more comprehensive set of instructions and additional tools (rivet gun, etc).

Step 1: Start the vehicle and turn the wheel to the opposite side of which you intend to work. This will grant you easier access to the fender liner.

Step 2: Remove the two 8mm fender liner bolts aft of the reflector and pull the liner loose.


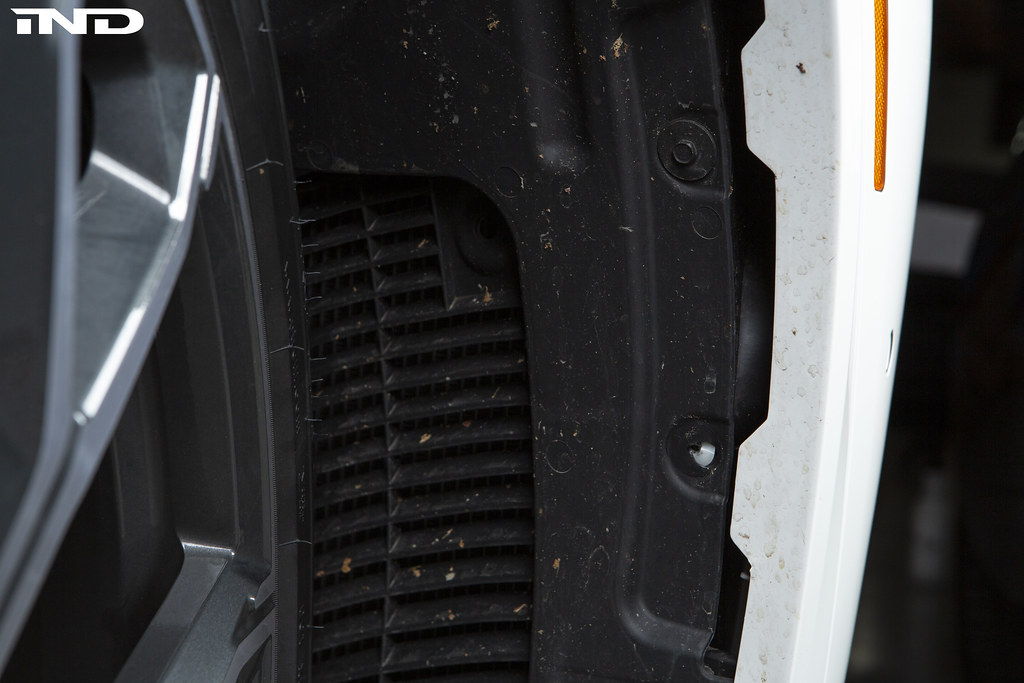
Step 3: Carefully pop the painted fender arch from its housing. There is no need to remove this piece completely; where the front bumper meets the fender is good enough.


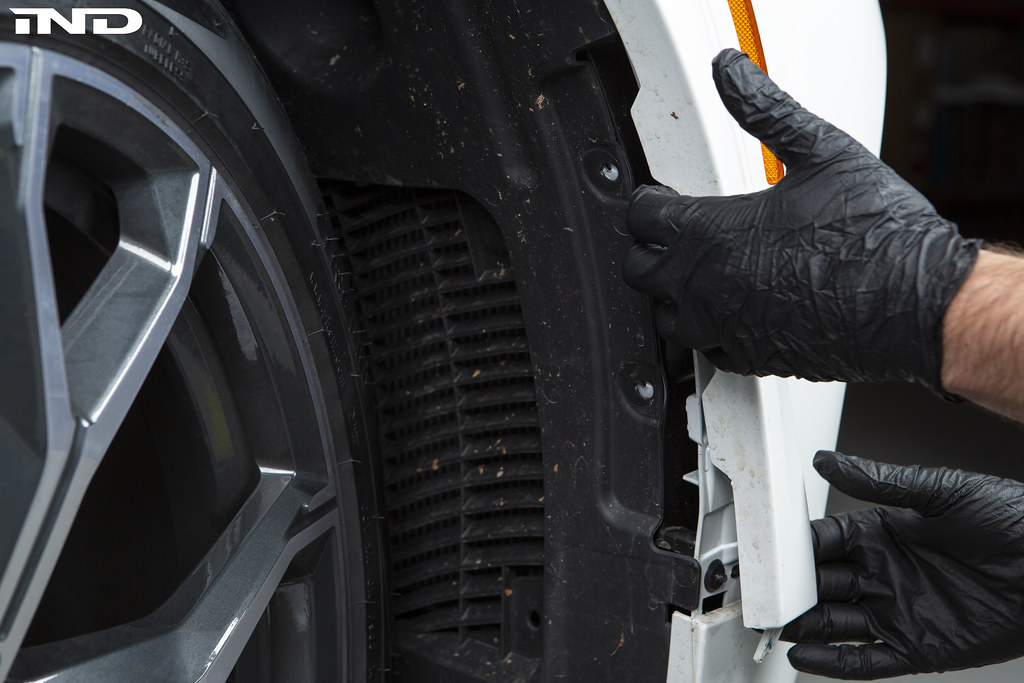
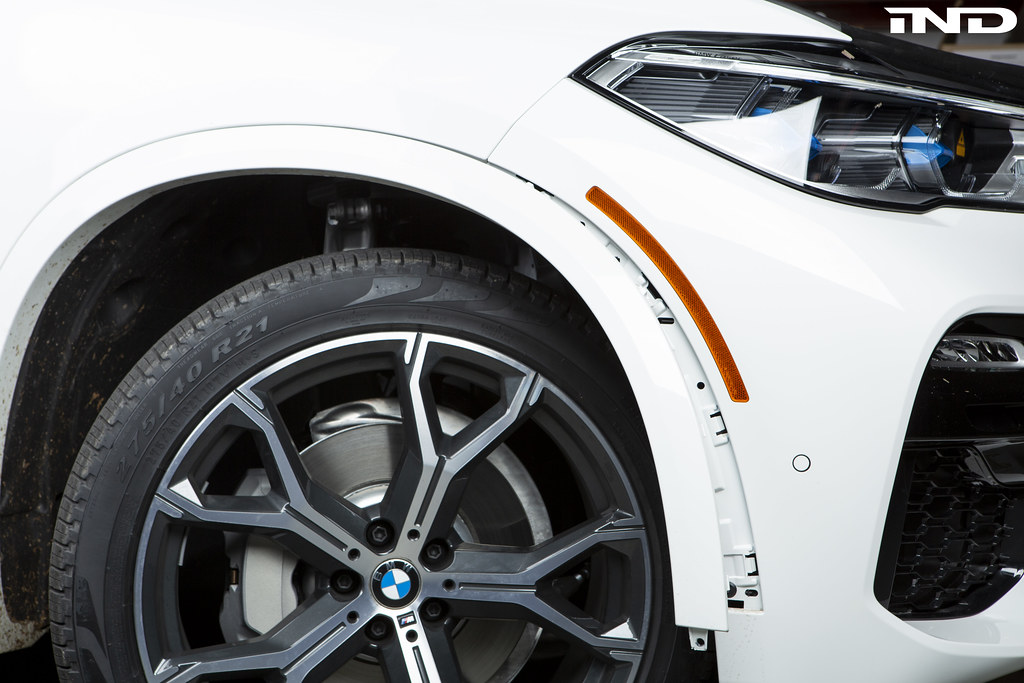
Step 4. Use a heat gun to apply uniform heat the OE reflector. This will soften the adhesive that holds the reflector in place. Please take note to keep the heat gun moving during this process to ensure no paint damage (burning) occurs.


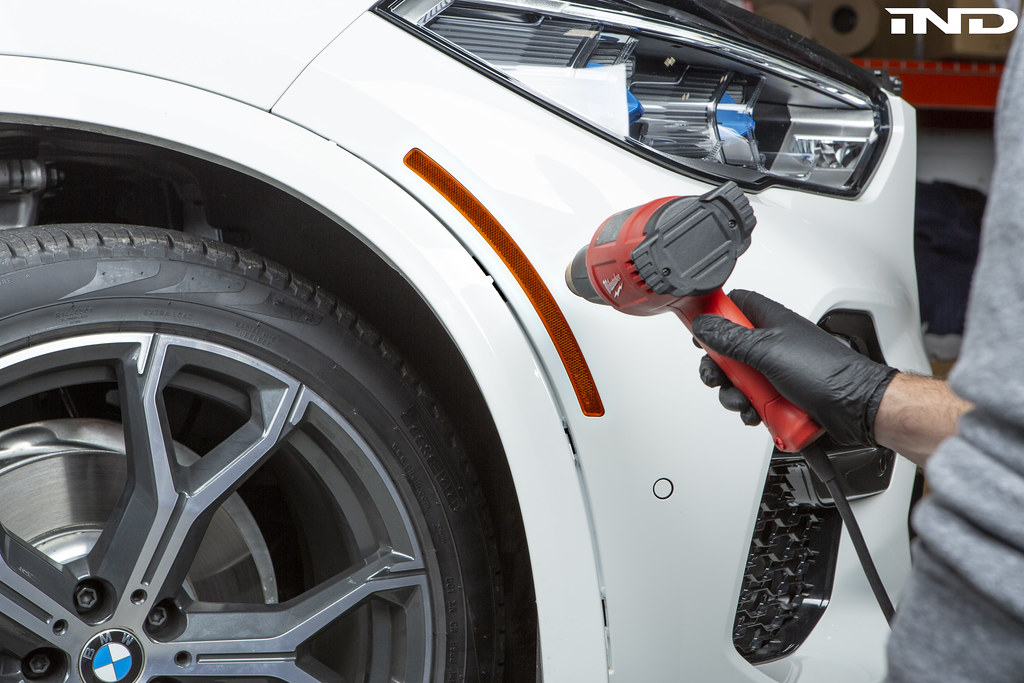
Step 5: With the reflector area properly "warmed up", use your thumbs to depress the OE unit while using your other fingers to simultaneously pull on the surrounding bumper from the inside of the fender liner. We've found it easiest to work from the bottom first.


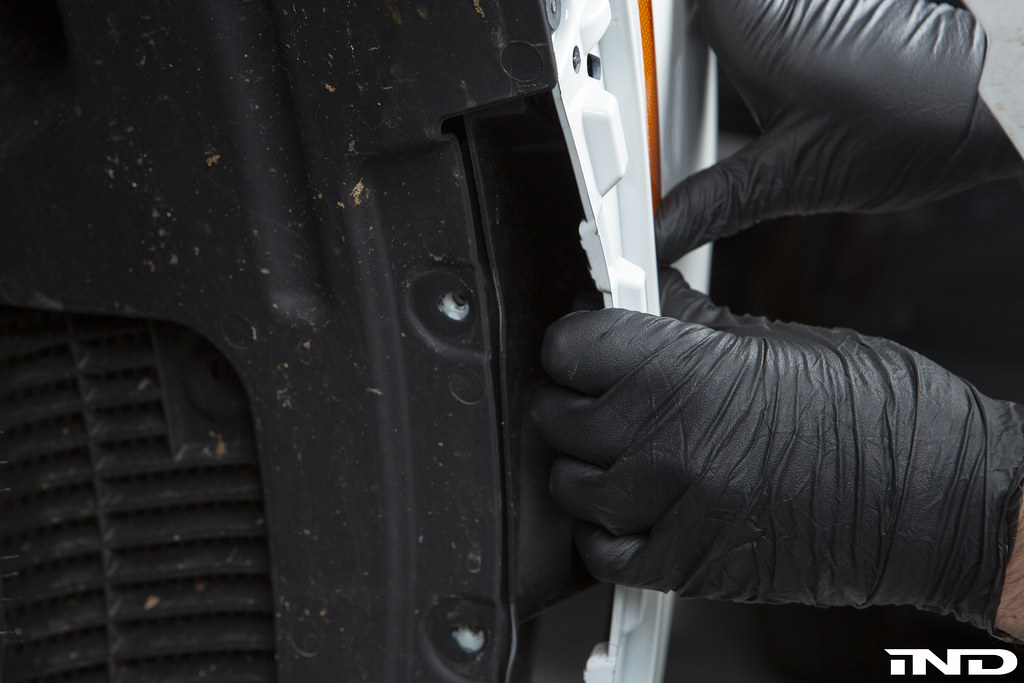
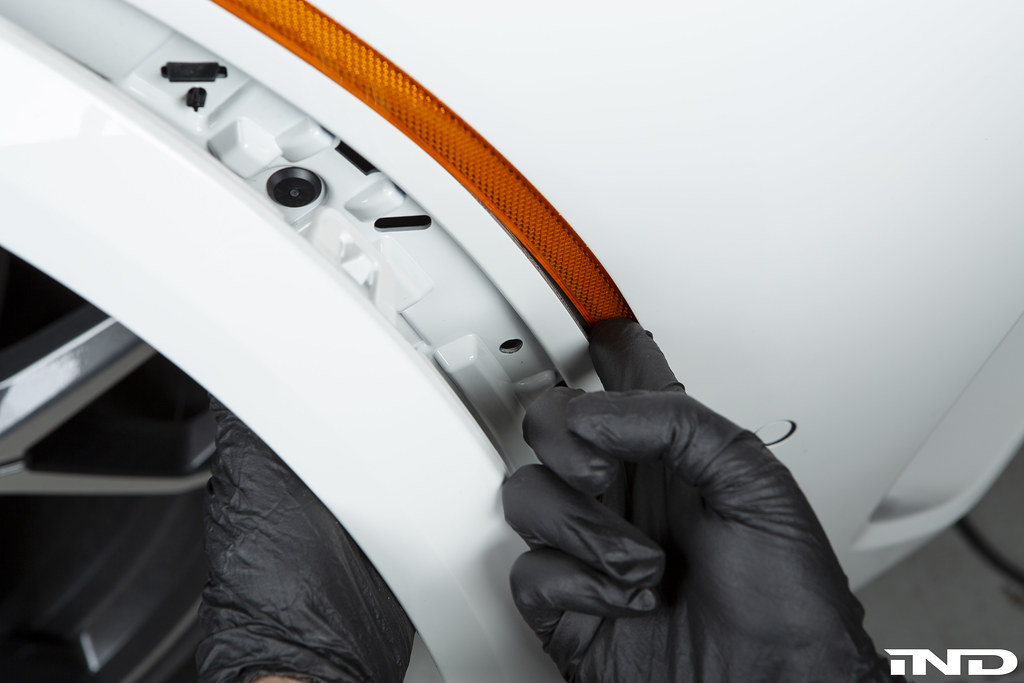
Step 6: Once the bottom of the reflector is freed from the bumper, you may slide a bondo spreader between the fender liner or "outside in" and pull it upwards to help release the adhesive.


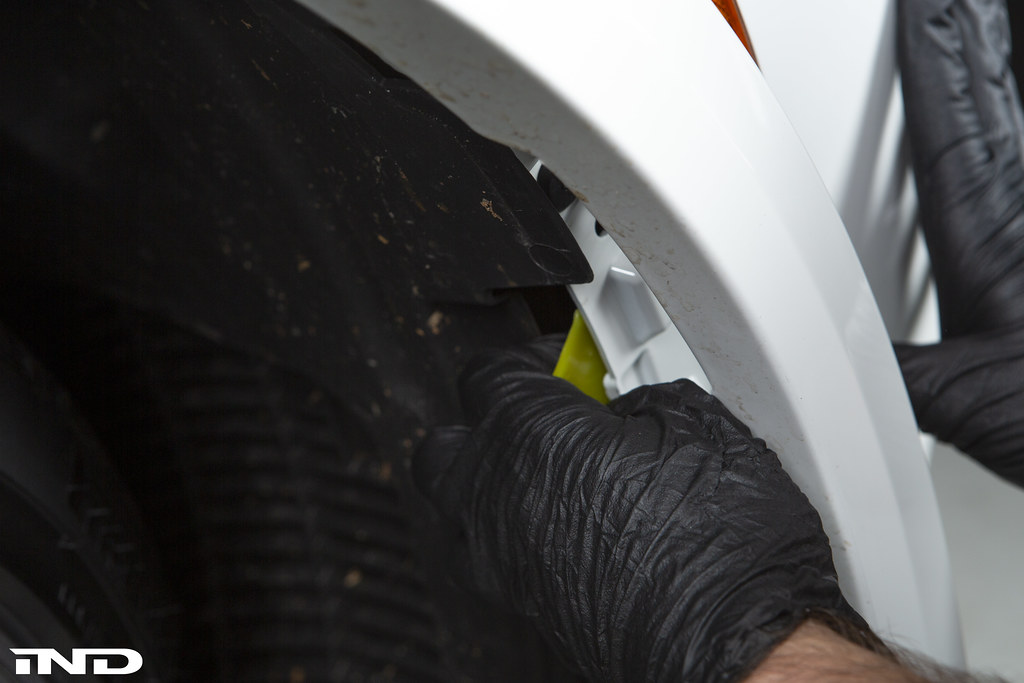
Step 7: With the reflector now completely free, you will need to slide it out from the bumper. Pull the bottom of the reflector down and towards you. This will pivot the top of reflector toward the front of the car. From here, you are able to work the reflector out through the fender liner.

NOTE: If you attempt to pull straight down instead of pivoting, it's likely that the + shaped retaining tab on the back of the reflector will get stuck on the plastic ducting element.


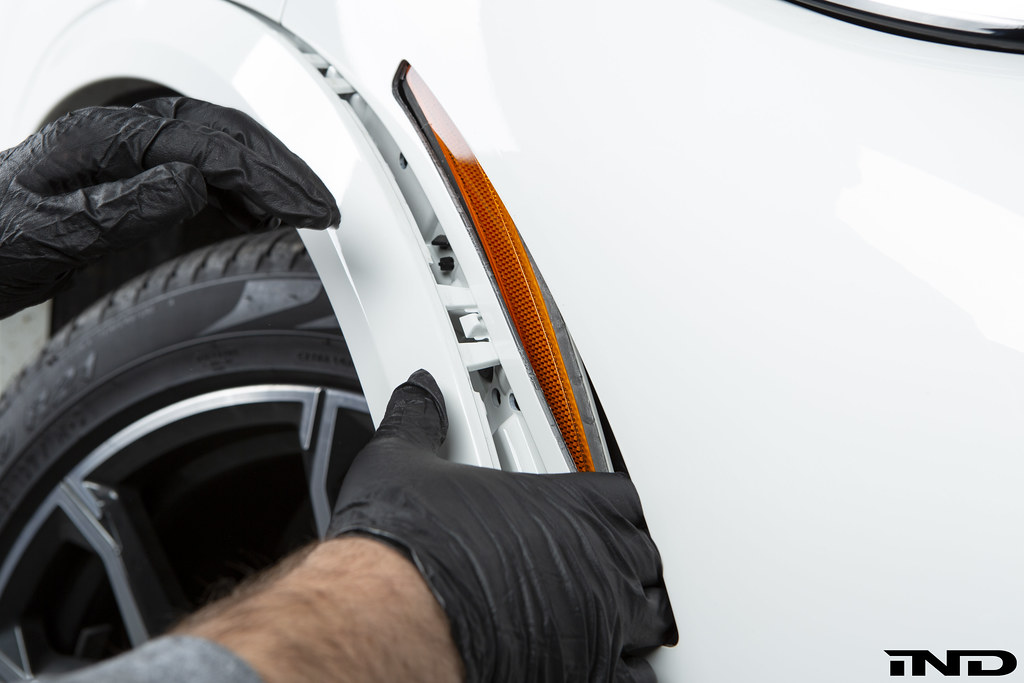
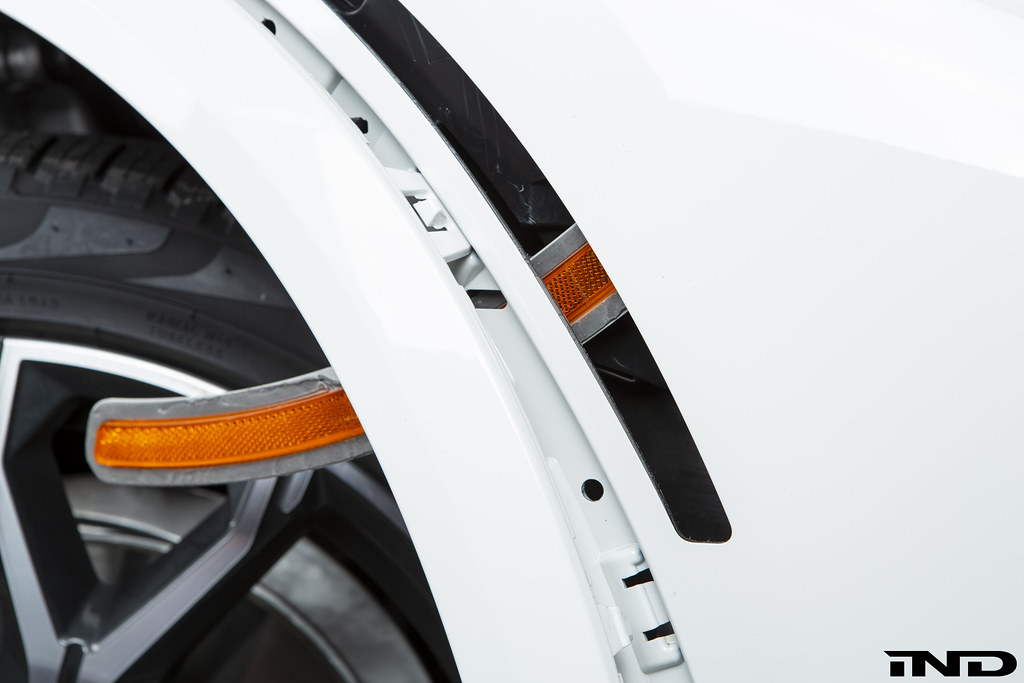
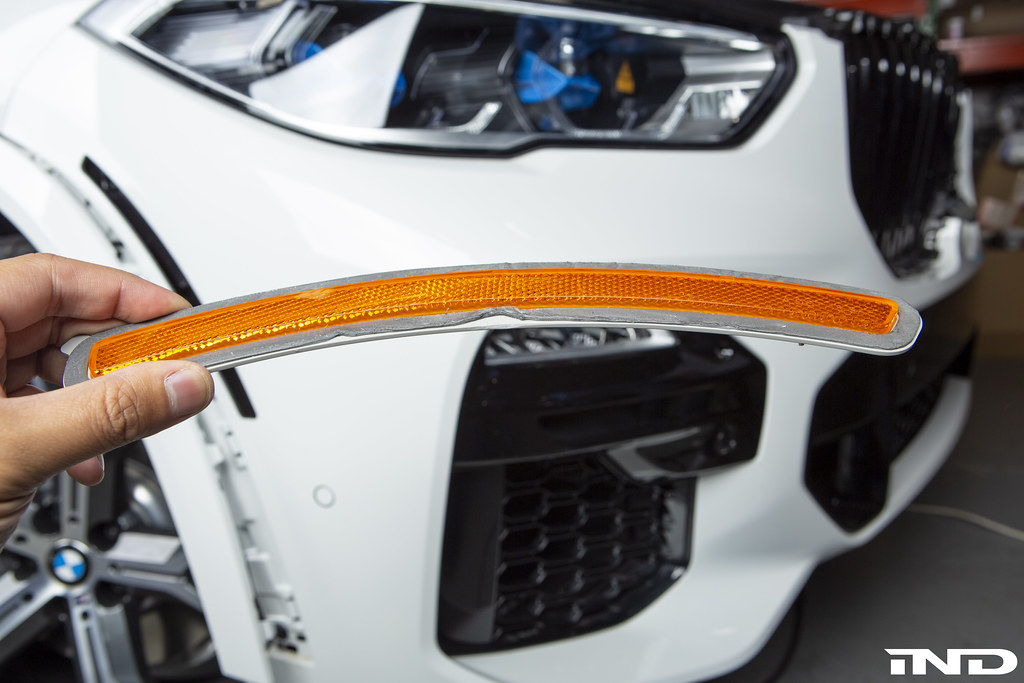
Step 8: Occasionally, all of the OE adhesive doesn't come out with the reflector. If some adhesive still remains, take some time to remove it completely from the inside of the bumper. This will ensure a uniformly flat contact area for the IND reflector replacement.


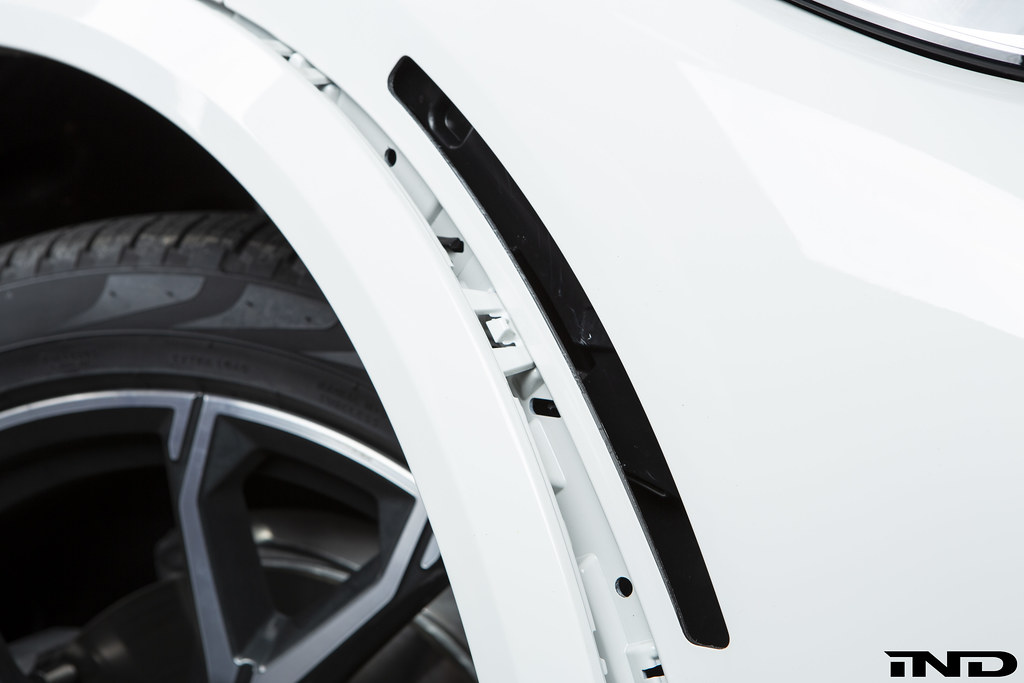
Step 9: Expose the adhesive on the IND painted reflector replacement.


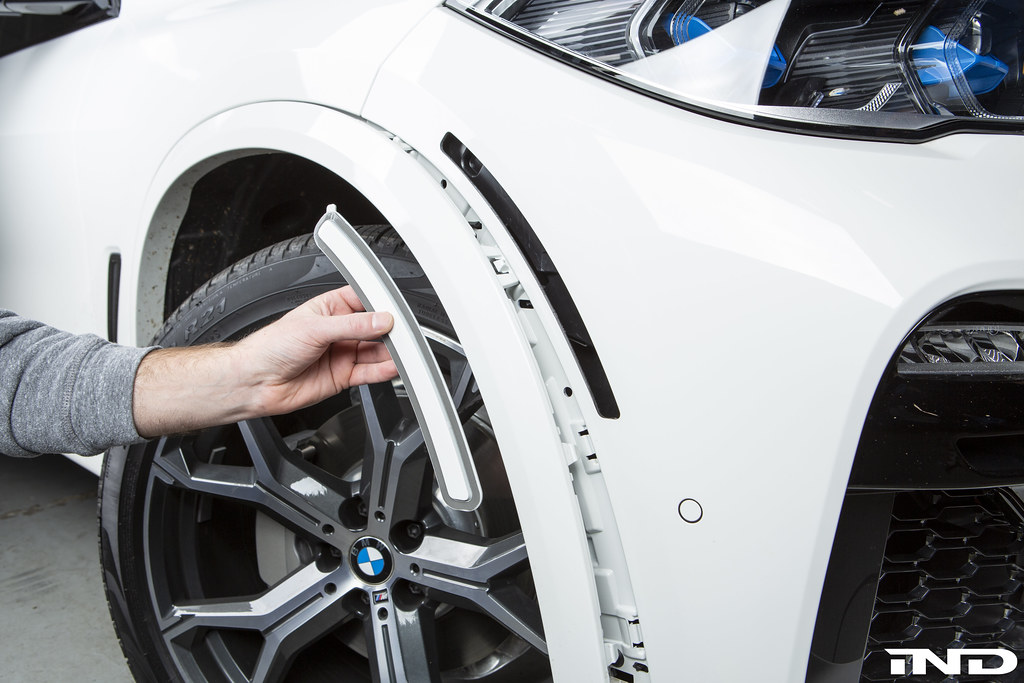
Step 10: Going from the "outside in", insert the IND reflector and position it properly. With uniform pressure behind the fender liner, adhere the IND reflector with the bumper. Similar to Step 5, you may also use your other hand to press the bumper edge forward creating a "sandwich effect" to ensure full adhesion.


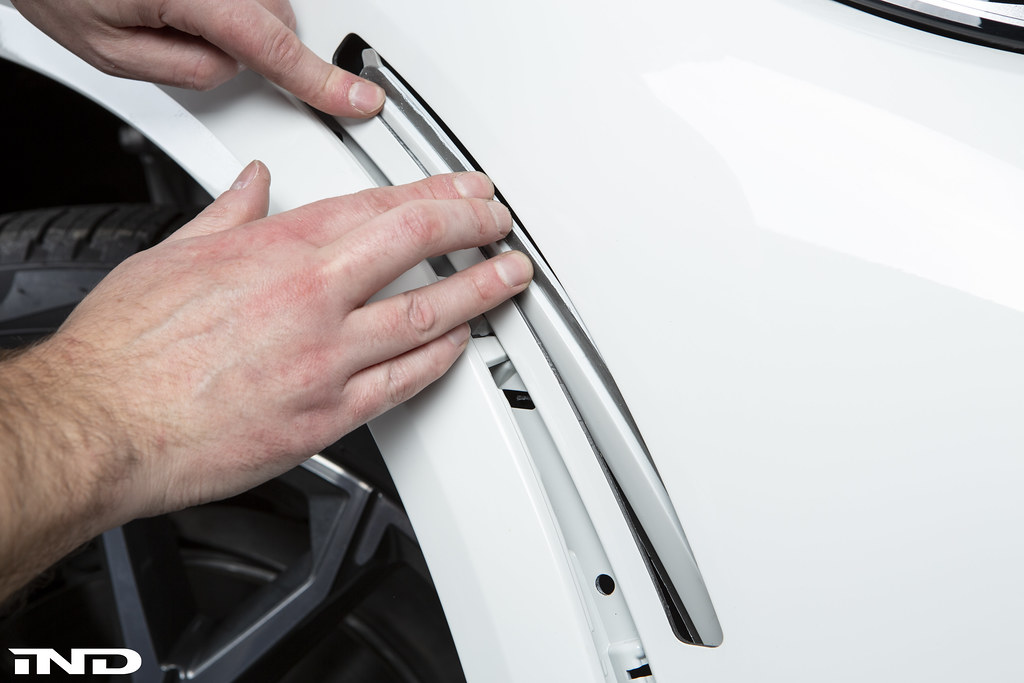
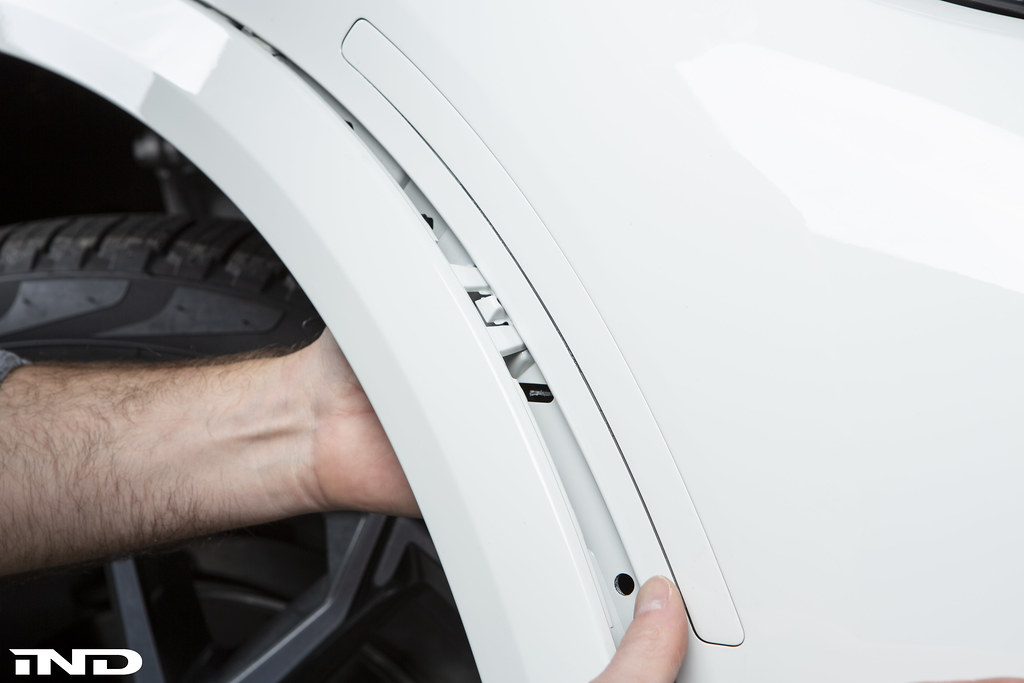
Step 11 (optional): Use a hand-held polisher to finish the front reflector.


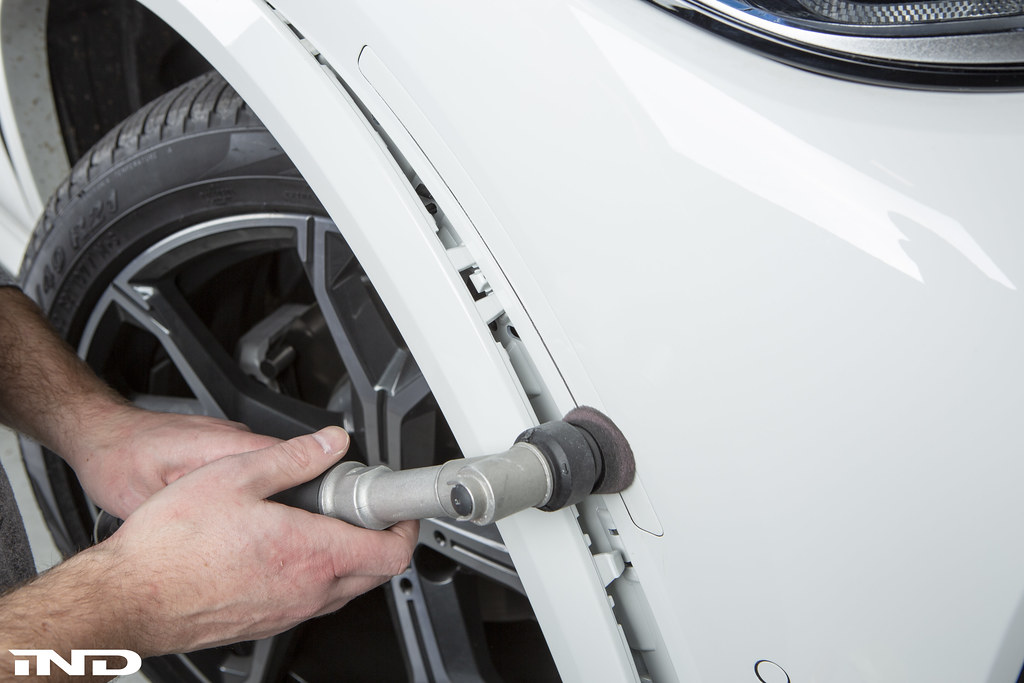
Step 12: Re-insert the OE fender arch trim, ensuring proper tab alignment prior to pushing it into place.


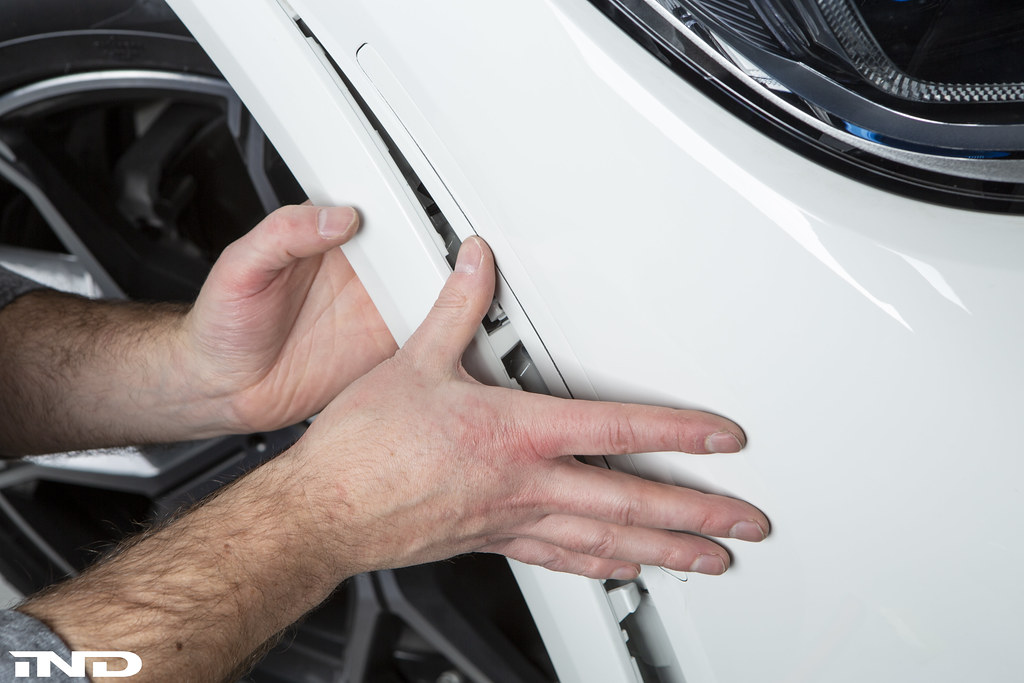
Step 13: Re-fasten the fender liner and install the 8mm bolts removed from Step 2.


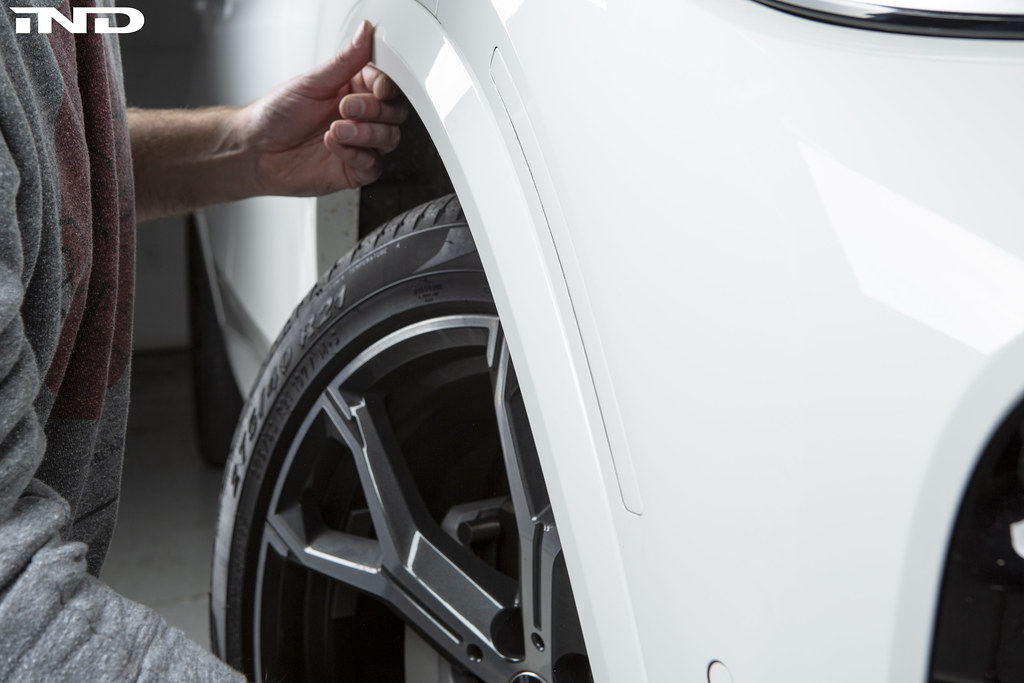
Step 14: Repeat this procedure for the other side.
__________________
IND DISTRIBUTION | 866-963-4520 • INSTAGRAM • YOUTUBE • FACEBOOK • FLICKR
Appreciate 10
r33_RGSport12906.00
ncm5guy27.50
Skilly40.00
iconoclast7260.00
boneca1996.50
Al Pinγ1839.50
      11-29-2018, 05:06 PM   #2
r33_RGSport
General
r33_RGSport's Avatar
United_States
12906
Rep
18,679
Posts

Drives: G09 XM, G05 X5 40, 991.2 T
Join Date: Oct 2009
Location: So. Cal

iTrader: (6)

Great work!!!
Much easier than F15/F16 F85/F86.
__________________
Email:sales@rgsport.com | IG:RGSport_USA | Web:RGSportShop.com
SPRING Sale!! 04/01 - 04/15 - Code: "SPRING2024"
MSS • iSweep • RaceChip • Sterckenn • AutoTecknic • Akrapovic • Vossen Wheels • Eventuri
Active Autowerke • KW • H&R • Ohlins • Remus • and more...
Appreciate 0
      11-29-2018, 06:08 PM   #3
M3 Chris
Private
M3 Chris's Avatar
38
Rep
95
Posts

Drives: 991.2 GT3 RS, X7 4.0
Join Date: May 2008
Location: Vancouver, BC

iTrader: (0)

Perfect. Once you guys get the blacked out kidneys ready for sale I'll purchase everything all at once.
Appreciate 0
      11-29-2018, 06:39 PM   #4
avengerboater
First Lieutenant
United_States
146
Rep
342
Posts

Drives: 2019 X5 xDrive40i
Join Date: Aug 2013
Location: United States

iTrader: (0)

Awesome! Thanks for the installation guide and pics! I'm receiving mine in the mail tomorrow, about 3 weeks before the actual car arrives.
Appreciate 1
      11-29-2018, 09:57 PM   #5
bizfiend
First Lieutenant
bizfiend's Avatar
Canada
146
Rep
330
Posts

Drives: Renting Corolla lol
Join Date: Jan 2008
Location: Toronto Ontario Canada

iTrader: (0)

Appreciate 0
      11-30-2018, 12:03 AM   #6
Jrunr
Captain
Germany
188
Rep
602
Posts

Drives: 2019 BMW X5 M40i - G05
Join Date: Oct 2018
Location: Savannah, GA

iTrader: (0)

Awesome. I already have mine sitting here and I don't eve have the X5 yet! LOL

When will you have the blacked out grille ready for sale? Please let me know ASAP!!!

Thank you!
Appreciate 0
      11-30-2018, 03:14 AM   #7
denniss
Captain
denniss's Avatar
392
Rep
769
Posts

Drives: BMW
Join Date: Oct 2015
Location: NJ

iTrader: (0)

What about rear reflectors ?
__________________
2022 x4mc (gone)
2019 X5 40i M-Sport (gone)
2016 X5 35i M-Sport (gone)
Appreciate 0
      12-04-2018, 01:52 AM   #8
bizfiend
First Lieutenant
bizfiend's Avatar
Canada
146
Rep
330
Posts

Drives: Renting Corolla lol
Join Date: Jan 2008
Location: Toronto Ontario Canada

iTrader: (0)

Quote:
Originally Posted by denniss View Post
What about rear reflectors ?
They're available now.

https://g05.bimmerpost.com/forums/sh....php?t=1560249
Appreciate 0
      12-27-2019, 10:32 AM   #9
vicfalc09
Second Lieutenant
vicfalc09's Avatar
211
Rep
274
Posts

Drives: M340i xDrive
Join Date: Feb 2019
Location: New Jersey

iTrader: (0)

Just completed my install and it is much harder then it looks in this write up. The + tab on the reflector makes it very difficult to maneuver into position. I do not see how they could have gotten the reflector in place going outside in. There is just not enough room to wedge the reflector through the outside.
Attached Images
    
Appreciate 2
      12-27-2019, 06:40 PM   #10
martinf79
Captain
martinf79's Avatar
191
Rep
802
Posts

Drives: 2020 G05 X5 M50i
Join Date: May 2012
Location: Toronto, Canada

iTrader: (0)

Quote:
Originally Posted by vicfalc09 View Post
Just completed my install and it is much harder then it looks in this write up. The + tab on the reflector makes it very difficult to maneuver into position. I do not see how they could have gotten the reflector in place going outside in. There is just not enough room to wedge the reflector through the outside.
Yeah ... I did the install 2 months ago... thought it would take me 30min... took hours. The first one took about 2 hours to install. Like you said, getting the new painted reflector installed from the outside-in was near impossible. I finally figured it out, but most frustrating install I've ever had to do. You would think they would show a more detailed instruction/visual on this step given how difficult it is. Once I figured out how to get it in, the other side only took me 20min or so.
__________________
2020 X5 M50i | 2015 X3 28i xLine | Retired 2013 335i M Sport
Appreciate 1
vicfalc09211.00
      12-27-2019, 09:08 PM   #11
vicfalc09
Second Lieutenant
vicfalc09's Avatar
211
Rep
274
Posts

Drives: M340i xDrive
Join Date: Feb 2019
Location: New Jersey

iTrader: (0)

Quote:
Originally Posted by martinf79 View Post
Quote:
Originally Posted by vicfalc09 View Post
Just completed my install and it is much harder then it looks in this write up. The + tab on the reflector makes it very difficult to maneuver into position. I do not see how they could have gotten the reflector in place going outside in. There is just not enough room to wedge the reflector through the outside.
Yeah ... I did the install 2 months ago... thought it would take me 30min... took hours. The first one took about 2 hours to install. Like you said, getting the new painted reflector installed from the outside-in was near impossible. I finally figured it out, but most frustrating install I've ever had to do. You would think they would show a more detailed instruction/visual on this step given how difficult it is. Once I figured out how to get it in, the other side only took me 20min or so.
I actually never figured it out and cut the + tag off. How did you get it in?
Appreciate 0
      12-28-2019, 09:11 AM   #12
martinf79
Captain
martinf79's Avatar
191
Rep
802
Posts

Drives: 2020 G05 X5 M50i
Join Date: May 2012
Location: Toronto, Canada

iTrader: (0)

Quote:
Originally Posted by vicfalc09 View Post
Quote:
Originally Posted by martinf79 View Post
Quote:
Originally Posted by vicfalc09 View Post
Just completed my install and it is much harder then it looks in this write up. The + tab on the reflector makes it very difficult to maneuver into position. I do not see how they could have gotten the reflector in place going outside in. There is just not enough room to wedge the reflector through the outside.
Yeah ... I did the install 2 months ago... thought it would take me 30min... took hours. The first one took about 2 hours to install. Like you said, getting the new painted reflector installed from the outside-in was near impossible. I finally figured it out, but most frustrating install I've ever had to do. You would think they would show a more detailed instruction/visual on this step given how difficult it is. Once I figured out how to get it in, the other side only took me 20min or so.
I actually never figured it out and cut the + tag off. How did you get it in?
The reflector has to be positioned downward first and inserted and then you have to pull the shit out of the top of the wheel well (the part that's been separated from the car) to create enough clearance behind it to insert the top part of the reflector and the tab to pivot. You have to pull on the wheel well piece almost like you're trying to rip it off of the car.
__________________
2020 X5 M50i | 2015 X3 28i xLine | Retired 2013 335i M Sport
Appreciate 0
      12-28-2019, 09:52 AM   #13
KDDI
Enlisted Member
United_States
13
Rep
32
Posts

Drives: 2019 G20 330i M-Sport
Join Date: Feb 2019
Location: Laguna Niguel, CA

iTrader: (0)

Garage List
2019 X5 50i  [0.00]
Just wonder is this legal in the USA to remove yellow reflectors?
Appreciate 0
      12-28-2019, 10:20 AM   #14
polychromatic
Second Lieutenant
polychromatic's Avatar
United_States
135
Rep
233
Posts

Drives: E30, E44, E61, E07
Join Date: Dec 2019
Location: Central No. America

iTrader: (0)

Quote:
Originally Posted by KDDI View Post
Just wonder is this legal in the USA to remove yellow reflectors?
Dunno, I changed out the orange to clear/white on my Carrera and M3, and no one noticed after multiple state inspections. Note these were relatively small reflectors compared to the X5’s and I think the orange stands out more on white body color.
Appreciate 0
      02-17-2020, 06:30 PM   #15
seanyo
New Member
seanyo's Avatar
18
Rep
13
Posts

Drives: 2016 X5
Join Date: Oct 2015
Location: New Jersey

iTrader: (0)

I took a stab at this install today. I must say that I thought it was easier to do on my F15 given that there was more room to work with behind the fender. It took me over an hour for the first side and less than 30 minutes for the second. 2 time saving tips that I learned while working on the first side is to buy 2 rivets and remove the ones that hold an internal plastic liner tight against the fender. I have marked up the IND pic to show the rivet location. The second is when removing the fender flare, the bottom vertical tab actually points straight down on the inside so its best to bend it up from inside the fender liner and push it out from there. The other fender tabs after that are accessible by hand and are easy to get out once the bottom tab of free.

I have include pics of the before and after too (sorry they are sideways...). Overall I love the look these reflectors, much more than the small cuts on my hands so I'd say the time and effort was worth it.
Attached Images
   
Appreciate 3
      04-06-2020, 12:57 PM   #16
Milangel
New Member
2
Rep
12
Posts

Drives: 2020 BMW X5 M50i
Join Date: Oct 2016
Location: NorthCal

iTrader: (0)

Quote:
Originally Posted by seanyo View Post
I took a stab at this install today. I must say that I thought it was easier to do on my F15 given that there was more room to work with behind the fender. It took me over an hour for the first side and less than 30 minutes for the second. 2 time saving tips that I learned while working on the first side is to buy 2 rivets and remove the ones that hold an internal plastic liner tight against the fender. I have marked up the IND pic to show the rivet location. The second is when removing the fender flare, the bottom vertical tab actually points straight down on the inside so its best to bend it up from inside the fender liner and push it out from there. The other fender tabs after that are accessible by hand and are easy to get out once the bottom tab of free.

I have include pics of the before and after too (sorry they are sideways...). Overall I love the look these reflectors, much more than the small cuts on my hands so I'd say the time and effort was worth it.
Tried to do this on my own yesterday but got blocked at the very beginning. When removing the fender flare, the tabs that lock the flare to the liner are so stubborn to disengaged. Couldn't get any one of them out of position.

So when you are talking about the "bottom vertical tab", which one do you refer to in the following pic (marked up from the IND pic)? A or B? As I did not see A in your pic.

Also how did you get that done (bending tab A up from inside the fender liner and push it out from there)? Did you use any tools or fingers only?
For tab B it seems that I have to either push it from the front bumper ventilation hole (2nd pic), or pull it from the gap behind the flare (3rd pic)?
Attached Images
   
Appreciate 0
      04-06-2020, 01:35 PM   #17
seanyo
New Member
seanyo's Avatar
18
Rep
13
Posts

Drives: 2016 X5
Join Date: Oct 2015
Location: New Jersey

iTrader: (0)

I was referring to the tab you marked as A. It is pointing down, if you bend it up (make it more horizontal) you can push it out of the slot. From there the tabs you have marked B can be be pushed out from behind. You should be able to see them . I trim tool would help but not required.

Quote:
Originally Posted by Milangel View Post
Tried to do this on my own yesterday but got blocked at the very beginning. When removing the fender flare, the tabs that lock the flare to the liner are so stubborn to disengaged. Couldn't get any one of them out of position.

So when you are talking about the "bottom vertical tab", which one do you refer to in the following pic (marked up from the IND pic)? A or B? As I did not see A in your pic.

Also how did you get that done (bending tab A up from inside the fender liner and push it out from there)? Did you use any tools or fingers only?
For tab B it seems that I have to either push it from the front bumper ventilation hole (2nd pic), or pull it from the gap behind the flare (3rd pic)?
Appreciate 0
      04-06-2020, 02:45 PM   #18
Milangel
New Member
2
Rep
12
Posts

Drives: 2020 BMW X5 M50i
Join Date: Oct 2016
Location: NorthCal

iTrader: (0)

Quote:
Originally Posted by seanyo View Post
I was referring to the tab you marked as A. It is pointing down, if you bend it up (make it more horizontal) you can push it out of the slot. From there the tabs you have marked B can be be pushed out from behind. You should be able to see them . I trim tool would help but not required.
Appreciate the info!

I notice that tab A has a hole. Does that mean it is secured with a screw or something similar? Or it is flexible to bend with fingers?

Right, I can see tab B from either front bumper or from behind. Did not notice tab A yesterday and had a hard time fighting to push tab B out from the very beginning
Appreciate 0
      04-06-2020, 04:56 PM   #19
seanyo
New Member
seanyo's Avatar
18
Rep
13
Posts

Drives: 2016 X5
Join Date: Oct 2015
Location: New Jersey

iTrader: (0)

I don't remember there being anything securing the A tab. Once that is free the other tabs should be easier to get out. Good luck!
Quote:
Originally Posted by Milangel View Post
Appreciate the info!

I notice that tab A has a hole. Does that mean it is secured with a screw or something similar? Or it is flexible to bend with fingers?

Right, I can see tab B from either front bumper or from behind. Did not notice tab A yesterday and had a hard time fighting to push tab B out from the very beginning
Appreciate 0
      04-10-2020, 06:09 PM   #20
mspete75
Enlisted Member
37
Rep
46
Posts

Drives: 24' i760m 20' X6M50 19' X5M
Join Date: Aug 2019
Location: Connecticut

iTrader: (0)

Love em!
Attached Images
    
Appreciate 2
      06-26-2020, 12:27 PM   #21
Ftpohyeah
Lieutenant
Ftpohyeah's Avatar
United_States
284
Rep
441
Posts

Drives: BMW
Join Date: Nov 2018
Location: in my bimmer

iTrader: (0)

Garage List
2022 X3 M Competition  [0.00]
2024 BMW  [10.00]
How do i remove the rivets? Do i need to push it in first or just yank n break it?
Appreciate 0
      10-23-2020, 10:35 AM   #22
iconoclast
Self-Deprecating Narcissist
iconoclast's Avatar
No_Country
7260
Rep
6,561
Posts

Drives: Audi BMW Ferrari LR MB
Join Date: Jan 2014
Location: In, Out & Around...

iTrader: (1)

The most difficult portion of this install is the removal of any adhesive left behind from the previous set of reflectors. Outside of that it is fairly straightforward and much easier if you remove the plastic rivet.
Appreciate 1
Flying Ace4983.50
Post Reply

Bookmarks

Thread Tools Search this Thread
Search this Thread:

Advanced Search

Posting Rules
You may not post new threads
You may not post replies
You may not post attachments
You may not edit your posts

BB code is On
Smilies are On
[IMG] code is On
HTML code is Off


All times are GMT -5. The time now is 11:23 AM.


xbimmers
Powered by vBulletin® Version 3.8.11
Copyright ©2000 - 2024, vBulletin Solutions Inc.
1Addicts.com, BIMMERPOST.com, E90Post.com, F30Post.com, M3Post.com, ZPost.com, 5Post.com, 6Post.com, 7Post.com, XBimmers.com logo and trademark are properties of BIMMERPOST