

|
|
|
|
 |
|
 |
BMW Garage | BMW Meets | Register | Today's Posts | Search |
 |

|
BMW 3-Series (E90 E92) Forum
>
DIY: USB install for JB3 2.0 through the firewall.
|
 |
| 02-09-2010, 09:17 AM | #1 |
|
BK Employee of the month! / Moderator

636
Rep 15,795
Posts |
DIY: USB install for JB3 2.0 through the firewall.
Since there doesn't seem to be a DIY on here for the JB3 2.0 USB install. I made a short write up on how to route the USB through the engine bay's firewall into the passenger side footwell. Then after that you can just run it up into the glove box. I'm sure everyone knows how to get into their DME and into their fuse box in the glove, so I'll leave that info out. lol!
Disconnect the negative terminal to battery. 1. Inside the passenger side footwell, below the glove box. Use a T8 torx bit or T8 torx screwdriver to remove the 2 screws where the yellow arrows are pointing and let the plastic cover lay on the floor. 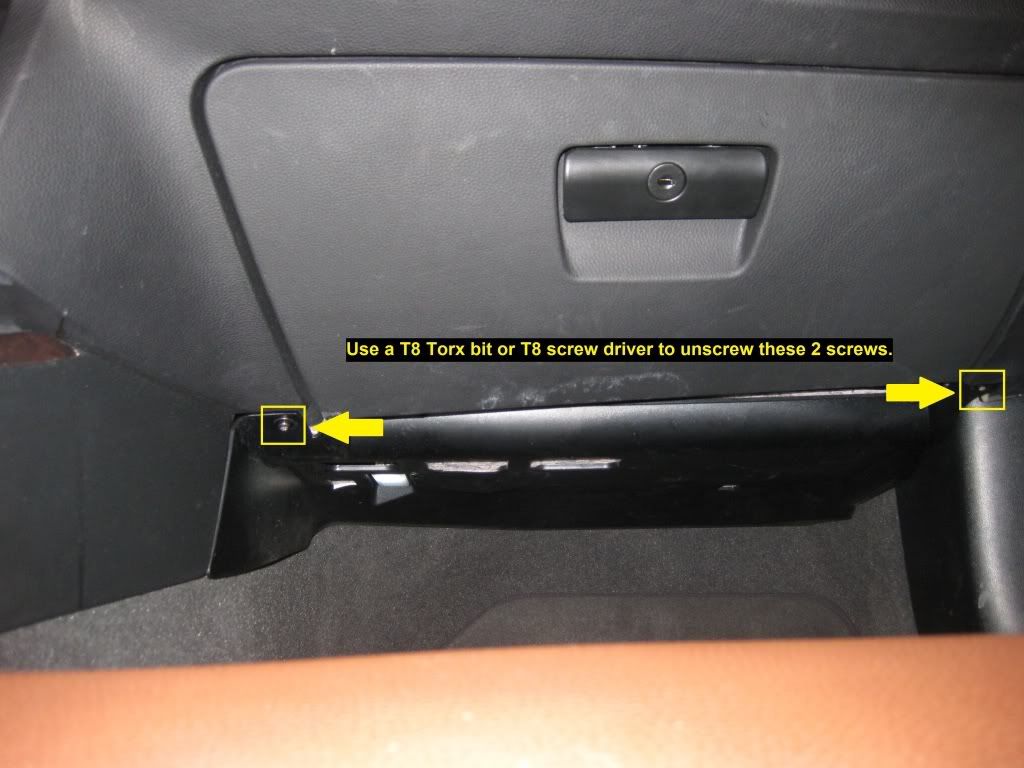 2. Go into engine bay to the DME box and unclip the plugs where the red arrows are. Every car is different because of options. So, mine might have more plugs than yours and some might have more or less than mine, but if you see plugs there, just unplug them. Don't worry about remembering which position it was taken out, it can only go back in one way. And it's all color coded, BMW FTW! lol! (The reason for unplugging the plugs, is so that it'll make it easier to remove the plastic dividers later on.) 3. Pull out the rubber grommets where the yellow arrows are. (This way, you can move the wires towards the headlights to give you more room to remove the DME, plastic dividers and the small plastic box that holds the DME.) 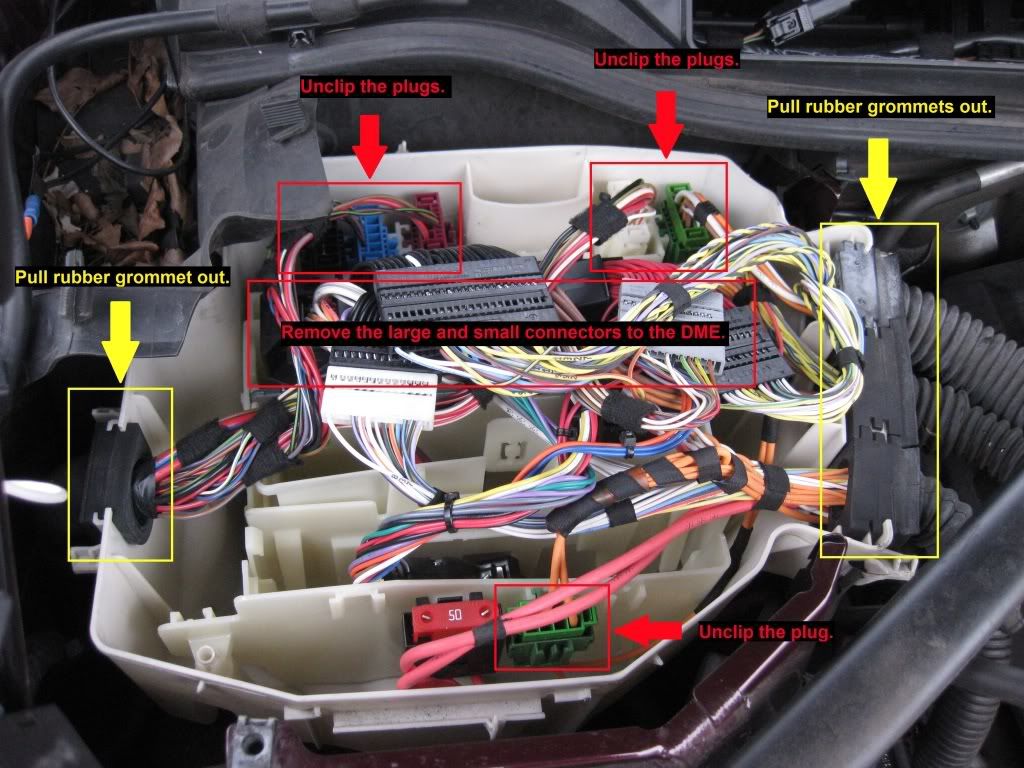 Once everything is unplugged and pulled out. Pull all the wiring harnesses towards the headlights and it should look like the pic below. 4. Pull the tabs where the yellow arrows are and remove the DME. 5. Pull the tab where the red arrow is to remove that divider. 6. Pull the tab where the green arrow is to remove that divider. 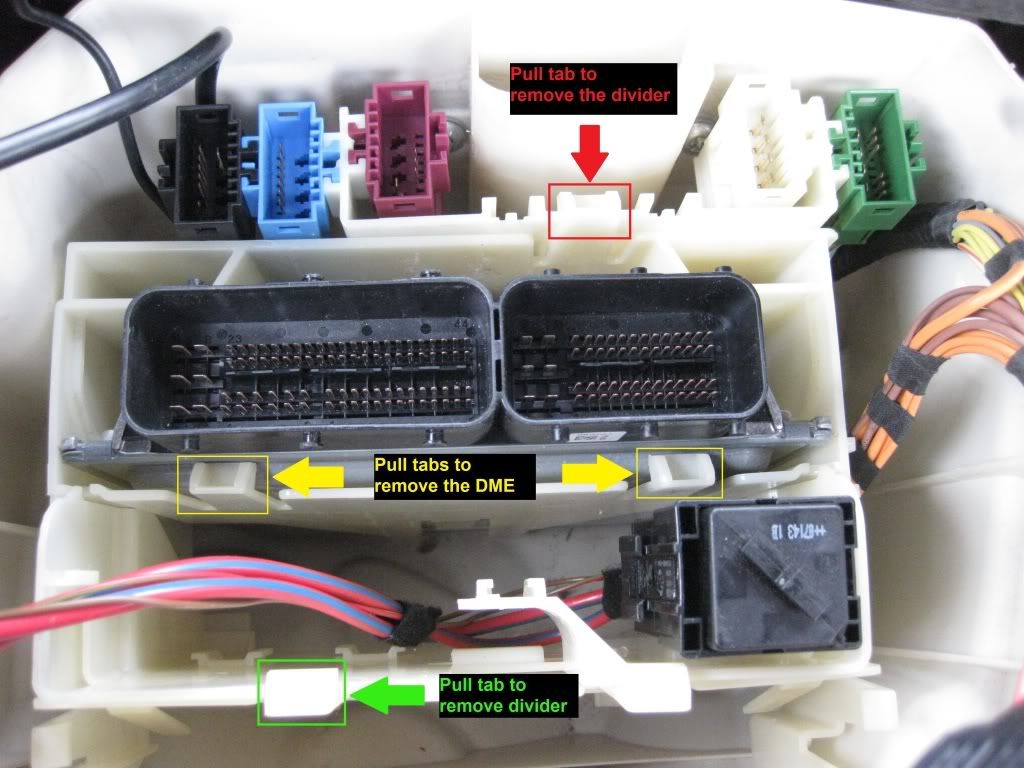 Once the DME and the dividers are removed, it should look like the pic below. 7. Remove the small box that holds the DME and the dividers. 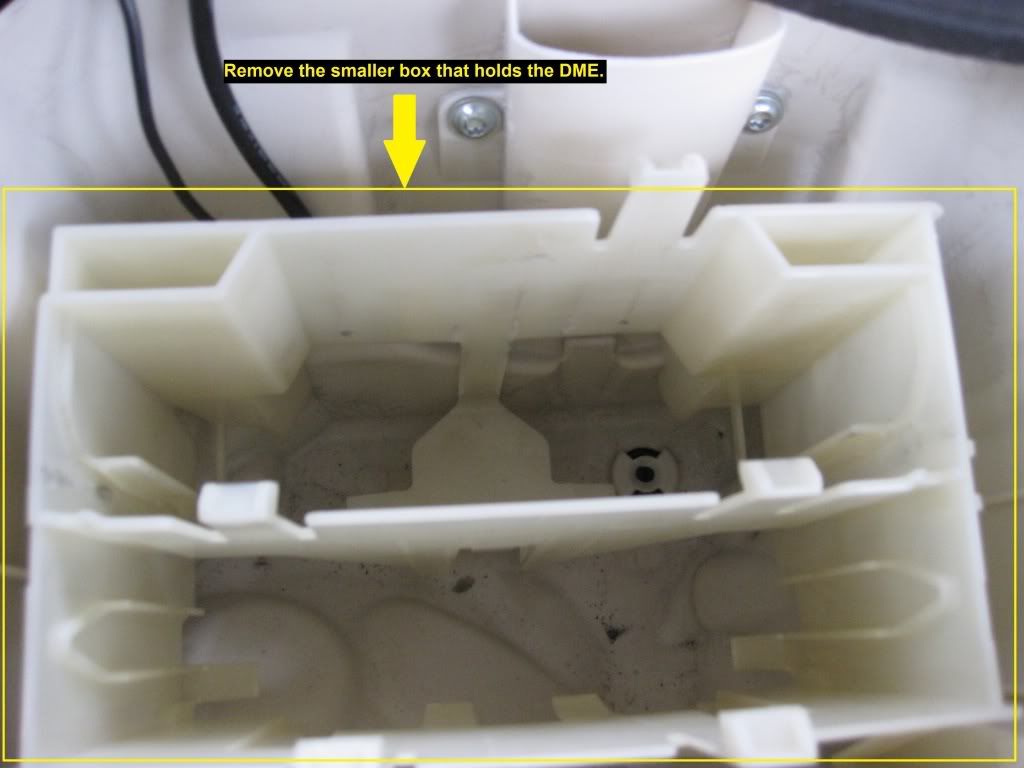 Once the box is out, you'll see a hole where you will push the USB wire through. 8. Push the USB cable straight down, don't need to use a lot of force, just stick it down and you'll see it in the passenger side footwell. Just push it through probably about an inch or two. (Don't need any type of hanger or wire.) 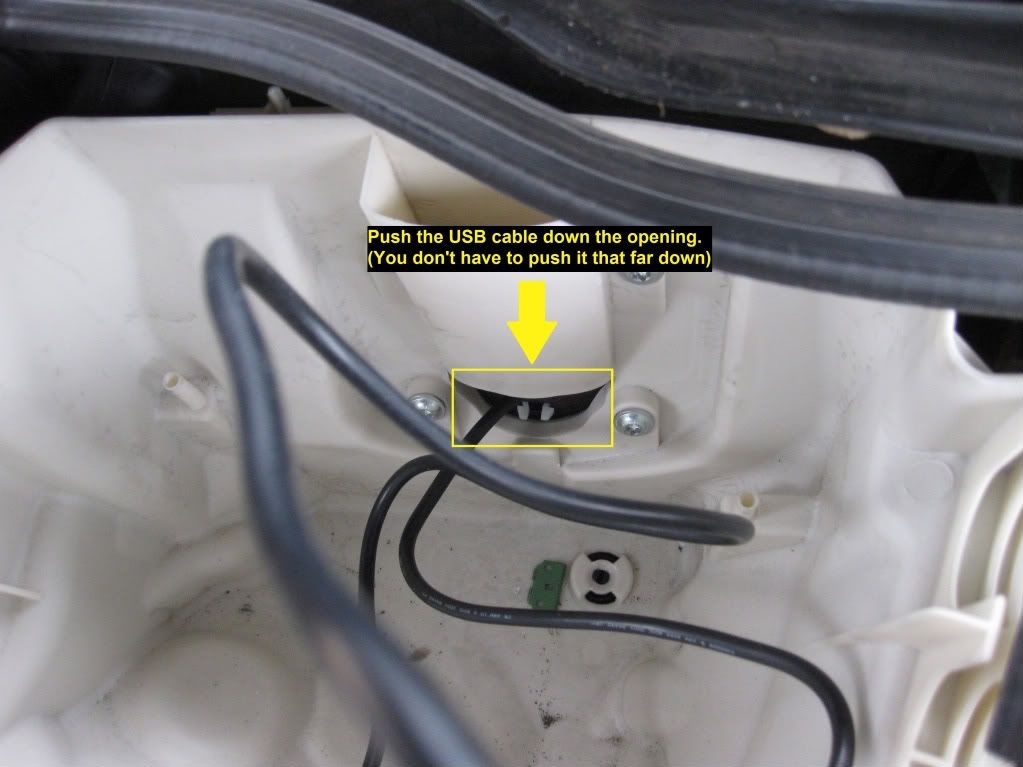 9. Go to the passenger side footwell in the middle and you should see the USB cable sticking out. 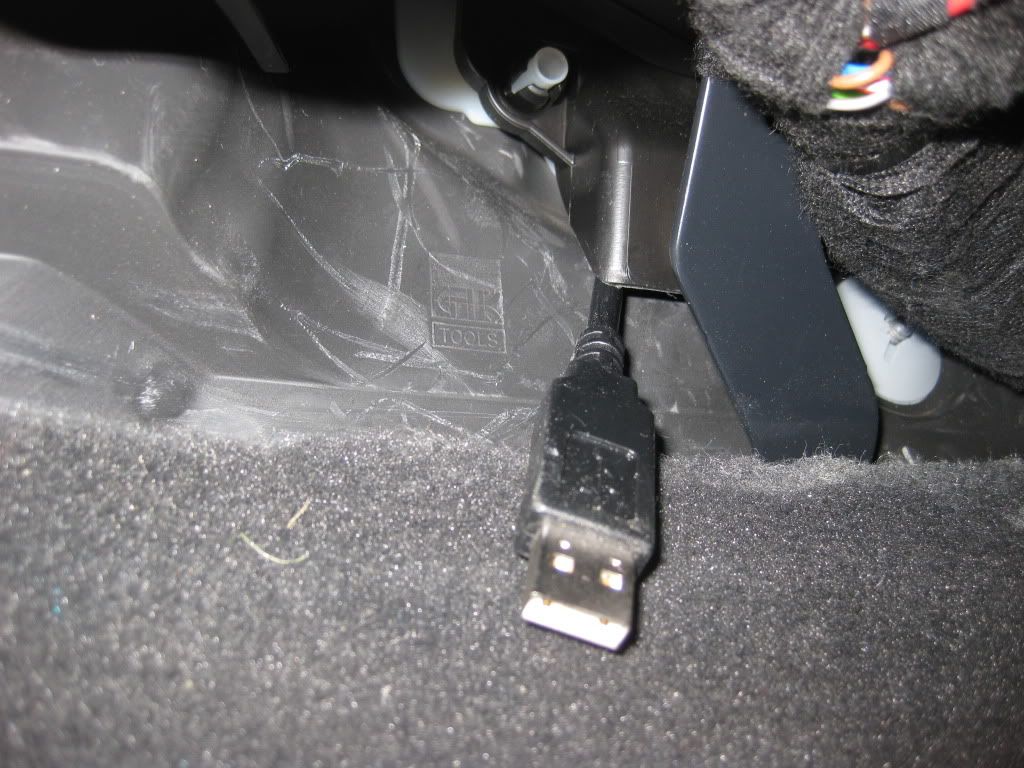 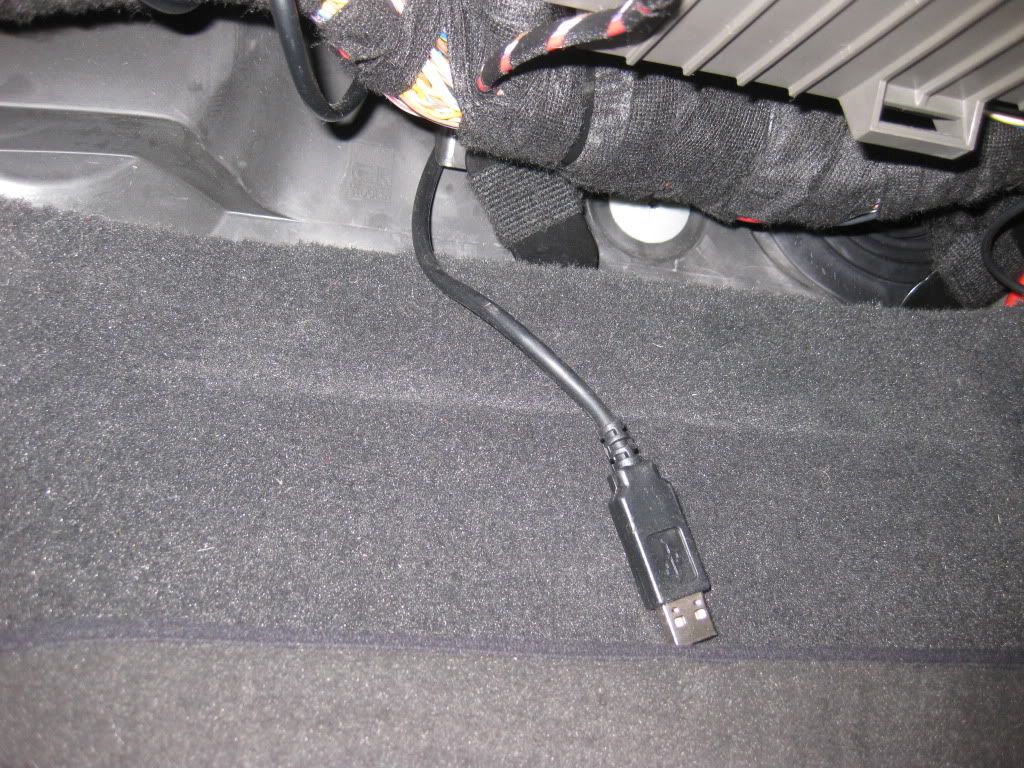 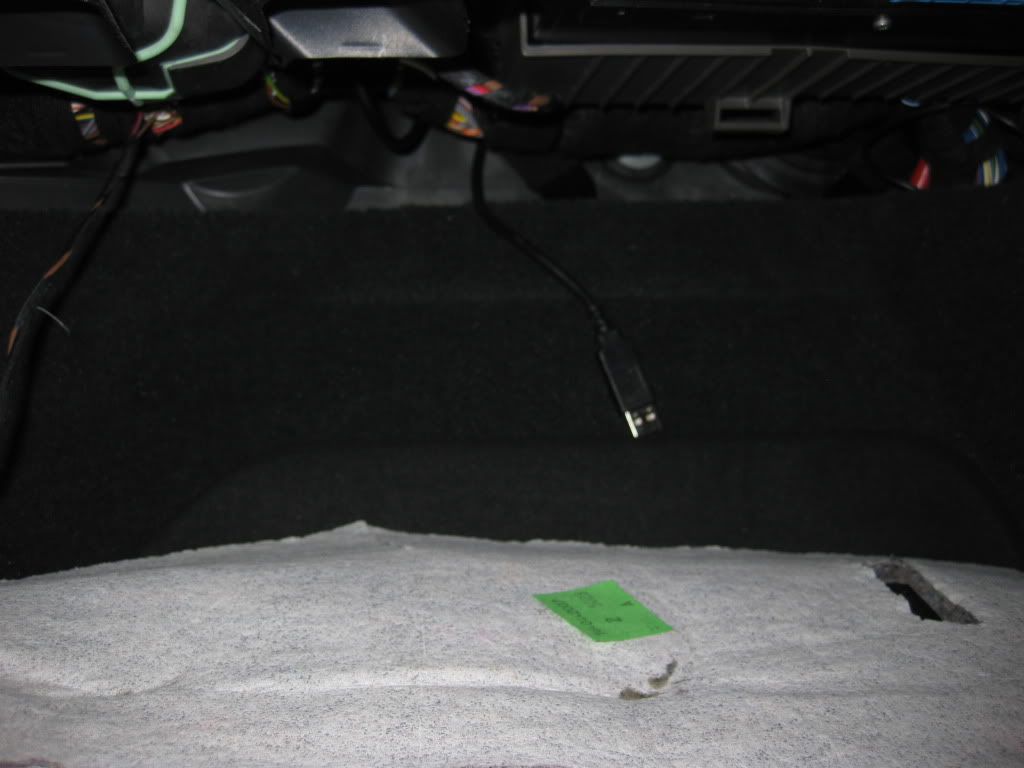 Once the USB is through, pull as much of it as you can and route it up into the glove box. Once the USB cable is through, just go in reverse and put everything back. Once everything is put back together, plug the negative terminal back onto the battery and test to make sure everything is good. After running the USB cable through the firewall, you can follow Terry's instructions on the 2.0 upgrade. That's it!  There might be easier ways to do this DIY, but I found this to be the easiest way for me. I have done 2 cars so far, mine and another member's and it's pretty straight forward. GL!
__________________
 Sponsored by: Pics of the ---> Barbera Beast <--- Martino Auto Concepts (Like them on Facebook MAC) Factory Trained & Authorized by BMW of North America Matt@Camber-Toe (Like them on Facebook Camber-Toe) LuxAngelEyes (Like them on Facebook LuxAngelEyes) LTBMW (Like them on Facebook LTBMW) OEMconcepts (Like them on Facebook OEMconcepts) |
| 02-09-2010, 03:45 PM | #2 |
|
Second Lieutenant
 29
Rep 219
Posts
Drives: 14 BMW 335xi M-Sport EBII
Join Date: Aug 2009
Location: Denver, CO
|
I did all of this without pulling out the grid, just the DME.
|
|
Appreciate
0
|
| 02-09-2010, 04:49 PM | #3 | |
|
BK Employee of the month! / Moderator
636
Rep 15,795
Posts |
Quote:
__________________
Sponsored by: Pics of the ---> Barbera Beast <--- Martino Auto Concepts (Like them on Facebook MAC) Factory Trained & Authorized by BMW of North America Matt@Camber-Toe (Like them on Facebook Camber-Toe) LuxAngelEyes (Like them on Facebook LuxAngelEyes) LTBMW (Like them on Facebook LTBMW) OEMconcepts (Like them on Facebook OEMconcepts) |
|
|
Appreciate
0
|
| 02-23-2010, 10:19 PM | #6 | |
|
Major
 
230
Rep 1,341
Posts |
Quote:
Great writeup!
__________________
 |
|
|
Appreciate
0
|
| 02-24-2010, 08:45 PM | #7 | |
|
BK Employee of the month! / Moderator
636
Rep 15,795
Posts |
Quote:
I know exactly what you mean. I was nervous my first time, too! lol! But BMW built the wiring harnesses really well. As long as you're gentle with the wires, it's easy sailing. 
__________________
Sponsored by: Pics of the ---> Barbera Beast <--- Martino Auto Concepts (Like them on Facebook MAC) Factory Trained & Authorized by BMW of North America Matt@Camber-Toe (Like them on Facebook Camber-Toe) LuxAngelEyes (Like them on Facebook LuxAngelEyes) LTBMW (Like them on Facebook LTBMW) OEMconcepts (Like them on Facebook OEMconcepts) |
|
|
Appreciate
0
|
| 02-25-2010, 07:18 AM | #8 |
|
Captain
144
Rep 871
Posts |
Just an FYI.. on my 2009 335i Sedan the Torx bolts in the first step (passenger side footwell) are T20s.. not T8s.
Also, I have a question... there is a light down there that is attached with a black cable coming out from under the glovebox. How does this black cable attach into the clear piece of plastic its going into? I tried pulling it out (with quite a bit of force) and it will NOT come out. I don't see any clips or anything holding it in. Anyone have any idea? |
|
Appreciate
0
|
| 02-25-2010, 10:09 AM | #9 | |
|
BK Employee of the month! / Moderator
636
Rep 15,795
Posts |
Quote:
GL!
__________________
Sponsored by: Pics of the ---> Barbera Beast <--- Martino Auto Concepts (Like them on Facebook MAC) Factory Trained & Authorized by BMW of North America Matt@Camber-Toe (Like them on Facebook Camber-Toe) LuxAngelEyes (Like them on Facebook LuxAngelEyes) LTBMW (Like them on Facebook LTBMW) OEMconcepts (Like them on Facebook OEMconcepts) |
|
|
Appreciate
0
|
| 02-25-2010, 03:17 PM | #10 |
|
Captain
144
Rep 871
Posts |
Ya, it definitely didn't pull right out for me and I had a flashlight on it and didn't notice any tabs. Oh well, I just let it hang down while I routed the USB cable. Got everything routed nicely. Thanks.
|
|
Appreciate
0
|
| 05-02-2010, 05:54 PM | #12 |
|
New Member

2
Rep 9
Posts |
Thanks for the excellent write up - I was able to get mine installed today thanks to this!
One thing I did that was a bit of a time saver and worked for me: I did not remove any of the cables out of the ECU. Instead, I lifted the 4 grommets and lifted up the entire assembly intact without disconnecting any of the connectors. It didn't come out far, but was enough for me to snake the cable down into the hole and into the car. |
|
Appreciate
0
|
| 05-02-2010, 10:00 PM | #13 | |
|
BK Employee of the month! / Moderator
636
Rep 15,795
Posts |
Quote:
__________________
Sponsored by: Pics of the ---> Barbera Beast <--- Martino Auto Concepts (Like them on Facebook MAC) Factory Trained & Authorized by BMW of North America Matt@Camber-Toe (Like them on Facebook Camber-Toe) LuxAngelEyes (Like them on Facebook LuxAngelEyes) LTBMW (Like them on Facebook LTBMW) OEMconcepts (Like them on Facebook OEMconcepts) |
|
|
Appreciate
0
|
| 04-17-2011, 09:12 PM | #15 |
|
Lieutenant
18
Rep 462
Posts |
Awesome pics and annotations! This was a breeze with this DIY. Was able to run the cable after just removing the DME. (didn't have to remove the DME box and cabling on headlight side of the ECU box)
thanks! |
|
Appreciate
0
|
 |
| Bookmarks |
|
|


