

| 08-23-2021, 08:59 AM | #23 |
|
Major
 186
Rep 1,482
Posts |
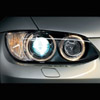
Just finished this job. The paint match and finish quality from IND was outstanding.
Here are some tips. I wouldn't even attempt this without drilling out the two plastic rivets first. IND includes extra rivets and a plastic rivet gun is $20 from Harbor freight. Clearance is too tight and its not worth fighting with the fender liner. Popping the body color trim is very simple. The hardest part is removing the old reflectors, followed by removing all of the OEM adhesive. I used a lot of goo gone, plastic scrapers, and cut up hands to ensure it was a perfectly prepped and clean surface for the reflector to mount to. I used a heat gun but it was still very hard to remove the oem reflector as it was a tight bond. I didn't want to heat the bumper beyond "hot" to the touch with the heat gun and it took quite a bit of time. I would budget 2 hours per side to do it properly, unless you get lucky and all the oem adhesive comes off without delaminating. In which case its a 20 minute job. My car is a 2020 model. |
|
Appreciate
1
IND-Distribution9594.50 |
| 08-23-2021, 10:55 AM | #24 |
|
Lieutenant
 
562
Rep 530
Posts
Drives: 2020 BMW X5 MSport Arctic Grey
Join Date: Mar 2019
Location: Seattle & Los Angeles
|
I had Ben do mine when I was in for other stuff...

__________________
2020 BMW X5 M-Sport
2021 Audi Q7 Prestige 2016 Aston Martin Vantage V8 |
|
Appreciate
0
|
| 06-04-2022, 08:17 AM | #25 |
|
Major
365
Rep 1,009
Posts |
I just ordered my set from IND and stumbled across this thread...Car's not even @ 150 yet.
Is complete fender liner required if you need access or just more or less about half the blind rivets coming across from the bottom going up. However, it seems that by -just removing the 2 tabs- in the back should be sufficient enough ? |
|
Appreciate
0
|
| 06-06-2022, 10:24 AM | #26 | |
|
BMW obsessed
9595
Rep 10,883
Posts |
Quote:
__________________
|
|
|
Appreciate
0
|
| 06-06-2022, 09:24 PM | #27 |
|
Lieutenant General
 4986
Rep 11,891
Posts |
Sigh, I want to do this, but have PTSD from doing the reflector on my M6. Looks like the same PITA process but now with the added + tab.
__________________
22 Phytonic/Coffee X5 45e (CoVID-free)
08 Speed Yellow 911 GT3 Sharkwerks 12 AW/Cinnamon X5d Sports Pkg (retired) 14 AW/Beige M6GC ZCP, MPE, V2 steering wheel, vorsteiner (retired) 08 SSII/Black E90 M3 (retired) |
|
Appreciate
0
|
| 06-07-2022, 06:29 AM | #28 | |
|
Major General
4679
Rep 8,739
Posts
Drives: eVeRyOnE mAD!
Join Date: Dec 2020
Location: neither here nor there...
|
Quote:
|
|
|
Appreciate
0
|
| 07-11-2022, 04:49 PM | #29 |
|
Major
365
Rep 1,009
Posts |
for the next person to stumble upon this, wheels off or full fender removal is not required. Just simply remove the 2 rivets, release the tab and there is plenty of room to work from removing it from the inside approach. I did remove the flare but did not do it on the other side, after doing 1 reflector.
Must be some sorta new VHB tape as on both reflectors, there was at least 2 spots about 2"+ of VHB that remained on the body and not the reflector. I was steaming the helluva out off it. My unit also has a option to spray out boiling water.....Cleanup/proper surface prep took the longest. I used goo gone, followed by 3M adhesive remover, then some leftover soap wash, rinse, leaf blower vac. Then a final wipe with Prepsol. Last edited by chefwong; 09-22-2022 at 07:15 AM.. |
|
Appreciate
0
|
| 09-09-2022, 02:36 PM | #31 |
|
Captain
338
Rep 842
Posts |
I can't help you with the rivet part number. I just released them and re-used what I had.
__________________
2021 G05 X5 ///M50i / Phytonic Blue / Cognac Vernasca
iStep 03/2023.50 |
|
Appreciate
0
|
| 09-21-2022, 08:01 PM | #33 |
|
Second Lieutenant
154
Rep 209
Posts |
Thanks everyone for the input, to pay it forward, a few things I recognize during installation.
1. If possible, do it when the car is new, cause it's pretty easy to separate the adhesive and clean it out. 2. I don't have a heat gun, but the hair dryer will do. 3. Using plastic pry tools help make the job easy, especially after thumb push lose the bottom, use the plastic pry to slice it through. 4. Buy the Harbor Freight Hand Riveter tool, it comes with the same plastic rivets that the car has. https://www.harborfreight.com/hand-r...ets-97757.html 5. Hardest part is to fit the Cross into the dipped spot, trick is start guided it in from the bottom up. 6. It’s 10mm, not 8mm, 2022 model year. Last edited by ddnmkun; 09-21-2022 at 08:35 PM.. Reason: Add |
|
Appreciate
4
|
| 02-18-2023, 06:17 PM | #34 |
|
Second Lieutenant
36
Rep 201
Posts |
Did mine today on an X5 built on Jan 18 and delivered on Feb 16.
If you have the capacity/workshop tools removing the wheel/fender linings etc would be easiest but this is still a pretty normal DIY with some patience and strong fingers and some thin mechanics gloves. The tips here are great and as mentioned, that second layer of black fender liner blocking the rear access to the top of the reflector makes this a trickier job than on cars like F10's but still doable. Take your time, drill out the rivets and pry them out. Use gentle heat gun application, loosen the bottom of the reflector first then work your way up. A little goo gone on a rag makes quick work of the left over adhesive, but you will still wear your fingers out finishing it up. Doing this on a 3 year old car would be way harder. I would add mask off everything around the work areas and even mask off the exposed part of the new painted reflector as it can easily rub against the paneling sliding it in. NOTE: Federal Highway Administration DOT law (I think § 393.11) specify(and the inspection state folks already know this) that vehicles are required to have orange reflectors on the front bumper a minimum of 16 inches off the ground or the vehicle is out of compliance. I would advise that everyone removing their front reflectors to also keep a few strips of orange reflective tape in your glove box. As mentioned in some Bimmerfest posts years ago, where an astute lawyer mentioned that if you got into an accident and there were pics of the front of your vehicle in the accident reports, etc you could absolutely get your ass handed to you by someone paying attention to the DOT laws if your front orange reflectors are missing. So basically if you get into a major crash, try to crawl out of the wreckage of your burning vehicle, ignore the screaming children for a few minutes, and slap a couple of those orange stickers on the front bumper before emergency services arrive 
__________________
2023 G05 X5 x40i Phytonic Blue
....many prior BMW's back to a 1966 1600 Last edited by Keyser Soze; 02-18-2023 at 06:22 PM.. |
| 02-18-2023, 08:17 PM | #35 | |
|
Second Lieutenant
130
Rep 221
Posts |
Quote:
|
|
|
Appreciate
1
ddnmkun153.50 |
| 02-18-2023, 10:34 PM | #36 |
|
New Member
0
Rep 13
Posts |
Also did mine the other day. Agree with the above posts that I wouldn't even attempt this without drilling out the 2 rivets (on each side) and replacing them. Also, heat gun would probably be better than the hair dryer I used and the biggest pain was detaching the reflector and removing the adhesive.
Would highly recommend taping off the paint surrounding the reflector as I definitely scratched mine while trying to pry the old reflector out. |
|
Appreciate
0
|
Post Reply |
| Bookmarks |
|
|


