406.9KVIEWS
119REPLIES
197APPRECIATES
62ACTIVE PEOPLE
20 hours agoLAST POST
Detailers Domain wroteHaha I need me one of those! Haha the closest I got is 2 good friends of mine who are very mechanically inclined. One is familiar with BMWs of this vintage so he's been a great hand for insight and assistance with BMW ownershipPretty easy you have to pull hard to remove it. That being said we had our in house mechanic do it.

Removing the old beat up "non oem" belly pan with an new Genuine part
OLD

NEW

KW V3
Syncro Design Works Thrust Arms
Brembo GT Front Brake Kit / 4 Pistion 355MM
ATE Rebuilt Rear Calipers
Rear Brembo Brake Cross Drilled Rotors
Rear Brembo Brake Pads
Goodridge SS Brake Lines (F&R)
H&R Spacers (I believe it's 12MM Front and 15MM Rear)

OEM Set Up


While the wheel liners were out, I took the opportunity to clean them up


Out with the old in with the NEW


Syncro Design Works Thrust Arms.
Since the OEM Thrust Arms were worn and on the way out I did some quick research to find that these were available, figuring they would improve handling and were about the same price as the OEM I would give these a try.

What a great looking piece!

Test Fit / No Spacers


Test Fit with the spacers


Some Install photos


Rear Brakes


MarcoF90 wroteI believe it's 2 - 4 screws and its fitted snugWas the Alpina Front lip easy to fit on to the front bumper? I am looking at going for an Alpina-esque appearance and have compiled my list of alpina parts I need and that is one of them.
Wolf 335 wrotewith this set up yes with a 4 adults in the car I do rub a bit. reduced the rubbing when we went up a turn or 2 and up to a stiffer setting and it reduced it a lot, under heavy load though I will still get some rubbing but far less.Do you rub in the rear when suspension compresses on dips in the road?
OEM Sport Steering Wheel refinished

The factory interior pieces were all worn due to age ..... Headliner / A/B/C Pillars/ Sunroof Shade / Sun Visor / Rear Deck Lid all redone in alcantara


Front seats were shipped out and restored to as new with new leather skins


Nice and tight

Front seats are in!


Rear deck lid restored and installed
Seats were pulled out for a thorough cleaning and conditioning


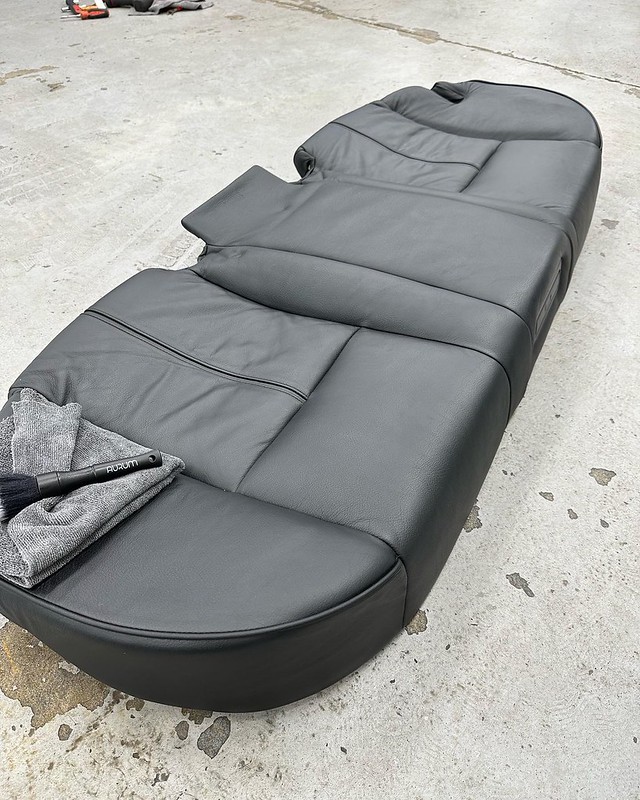
Deep cleaning with extraction and Nanolex Professional Interior Cleaner with Odex


Rendition Cup Holder with USB Ports to replace the old OEM ash tray


Dash Vent replaced with new one

B Pillars were damaged, lucky to find these brand new OEM ones still in stock (other colors NLA) when I ordered the black ones were still available.

Top one was buckling, botton one new OEM


Polished out the wood trim with a Rupes ibrid and Rupes Fine Polish

Removed the wood shift knob and replaced it with an all leather OEM version

Rear sun shades were replaced

Beat up oem floor mats were swapped out for new! New OEM fronts and OE rears (NLA)


Putting it all back together

New screen


tracer bullet wroteI would love to get new but since most are NLA I have to fix or restore them.Awesome build! Thanks for taking the time to document it here. I love that you are restoring the original parts when you can instead of just buying all new.
FC4 wrotethank you.This is so cool.
Swapped out the OEM head unit for an updated AVIN with Apple Car Play...loved it for the look and fitment.........


Unfortunately digging deeper with the audio system I found, the rear deck speakers were disintegrated and a few of the speakers were blown.

Blown speakers


BavAuto 5 inch Woofers - direct replacements in


Focals in doors


OEM Speakers

Focal Speakers

Focal 6 Channel Amp


